
Setting Up Azure DevOps CI/CD Pipelines for Dynamics 365 Finance and Operations Unified Environments
In this blog post we will explore how to build and implement CI/CD (Continuous Integration and Continuous Delivery) pipelines using YAML based pipeline definitions, Git source control, and Azure DevOps for Microsoft Dynamics 365 Finance and Operations (D365 F&O) Unified Environments to produce packages and deploy them between multiple D365FO application environments like Test (UAT) and Production.
Repository structure
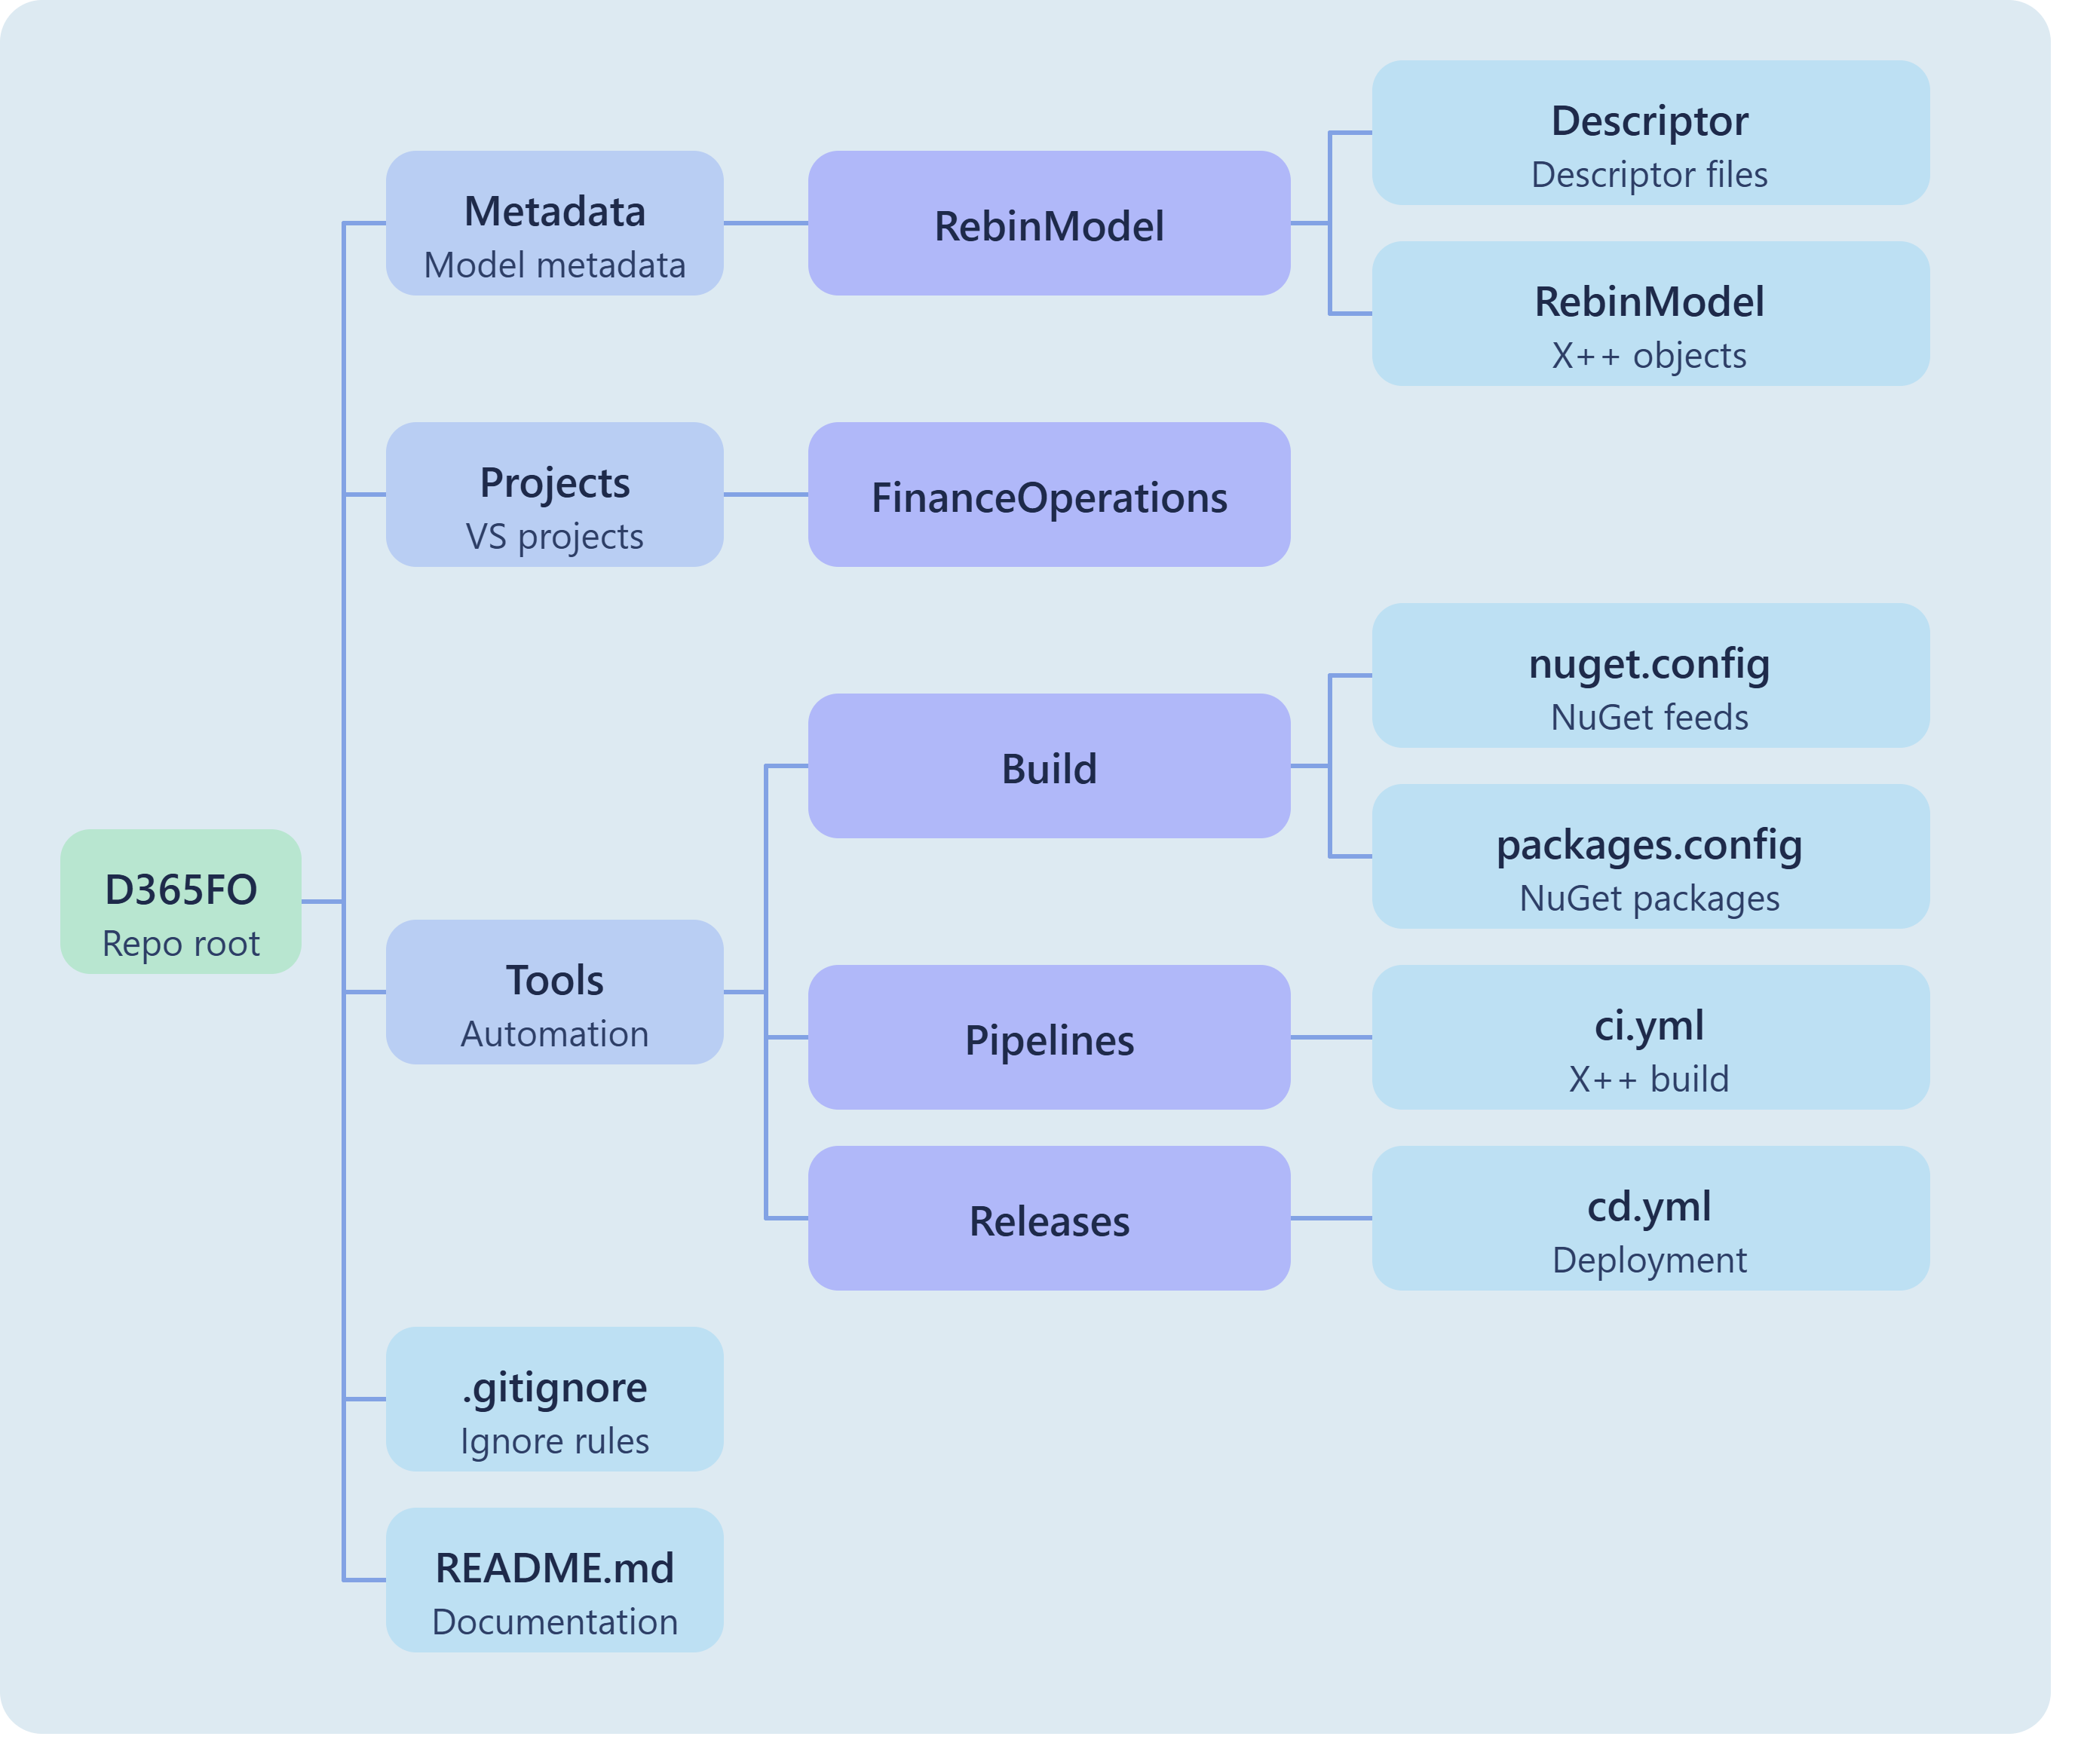
I have created the folloing structure for the repository is organized to support automated build and release workflows CI/CD making it easier to manage custom X++ source code alongside build configs in Azure DevOps.
-
D365FO: Repository root directory.
-
MetaData: Contains custom model (RebinModel) and its x++ code.
-
Descriptor Contains XML descriptor file that define the models name,version and dependencies such as ApplicationSuit, ApplicationCommon or ApplicationPlatfrom
-
RebinModel Contains X++ source files like classes, tables, forms, extensions, queries, and reports.
-
Projects: FinanceOperations contains the Visual Studio solution and project files the build process uses these files to know exactly which custom code files to compile into assemblies.
-
Tools: Contains automated build and release script
-
nuget.config: Configures the NuGet feeds and package sources used to download the D365FO platform and compiler packages from Azure Artifacts.
-
packages.config: Declares the exact versions of the Microsoft D365FO platform and application reference packages required by the compiler during the build pipeline.
-
Pipelines: Contains the automation file that responsible for Continuous Integration (CI) (ci.yml) pipeline script it handles restoring NuGet packages, compiling X++ code, running tests, and creating the deployable package.
-
Releases: Contains the automation file that responsible for Continuous Delivery (CD) (cd.yml) pipeline script that takes the built package and deploys it to target environments (UAT, Production) through LCS or Power Platform Admin Center.
-
Root Files: .gitignore file contain rules for Git to ignore specific files or folders. README.md file contains documentation guidelines for the development team.
Deploy Nuget packages to Azure DevOps Artifacts
The build pipeline required Nuget packages which you can dowanload them through LCS or Visual Studio Power Platfrom Extension these packages responsbile for build the new package the contains custom development x++ source code.
Step 1: Connect to Dataverse
Open Visual Studio and navigate to:
Tools > Connect to Dataverse
Step 2: Enable NuGet Package Download
After successfully connecting to Dataverse navigate to:
Options > Power Platform
Check the following option:
Download Dynamics 365 Finance and Operations NuGet Packages for CI/CD
Step 3: Download NuGet Packages
Navigate to:
Tools > Download Dynamics 365 Finance and Operations NuGet Packages for CI/CD
This will download the required NuGet packages for your CI/CD setup.
In this case I am going to dowanload (10.0.2790.83 / 7.0.8199.55) version for the build packages version that support the target environments like (UAT, Production)
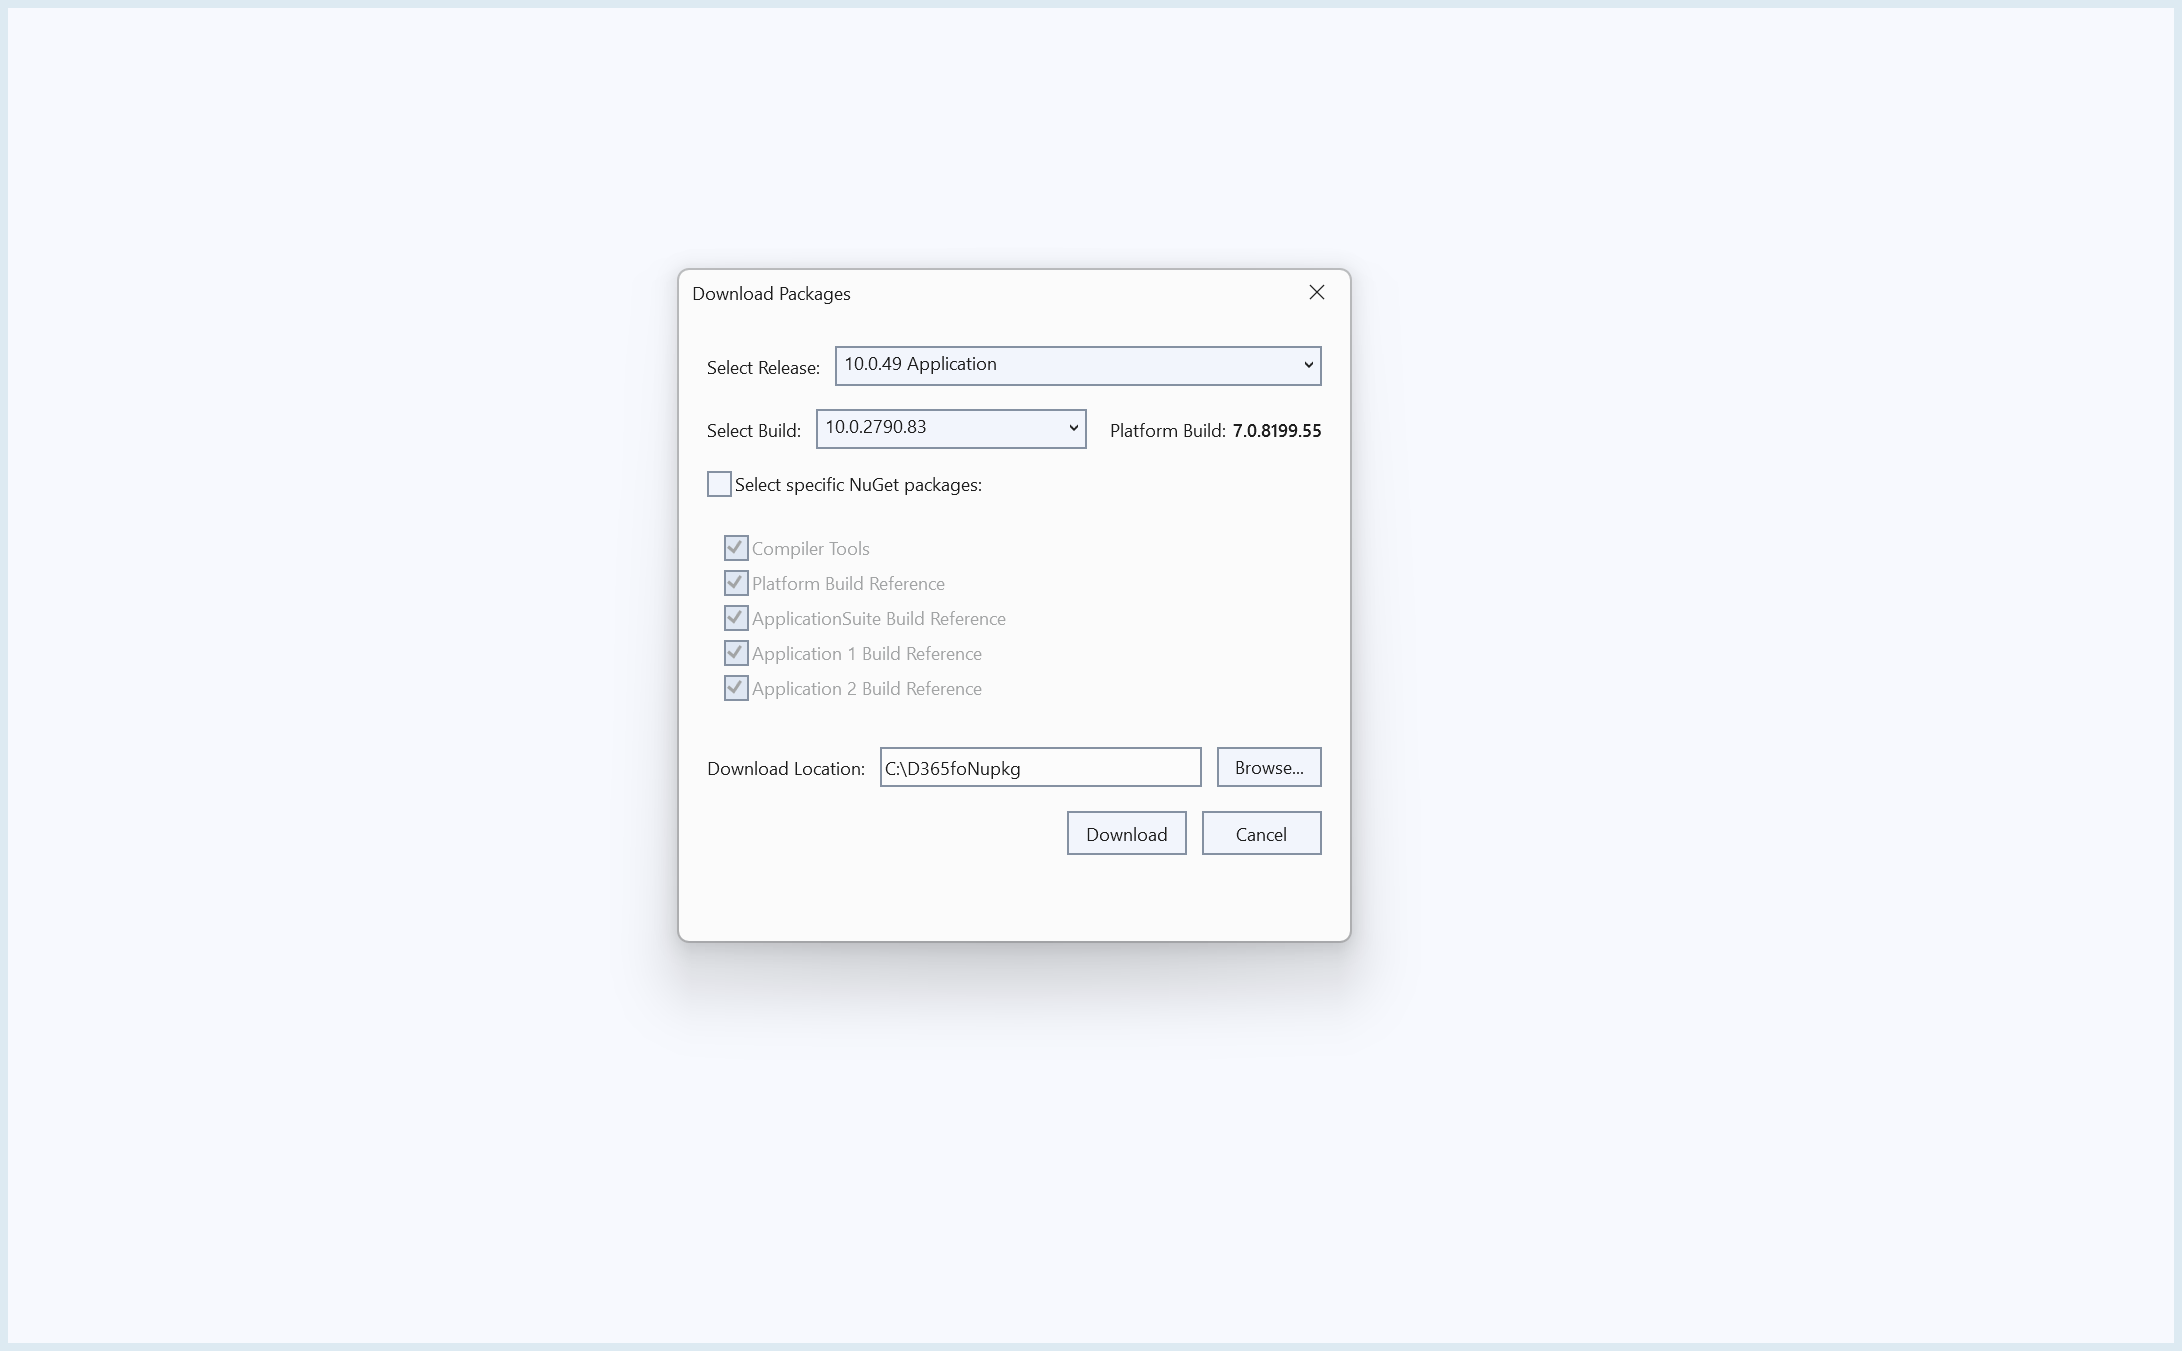
After downloading all the NuGet packages we need to publish them to Azure DevOps Artifacts. First lets download the NuGet.exe tool and save it in the same folder where you previously downloaded the NuGet packages.
Step 4: Connect to Feed
Open Azure Devops Project navigate to:
Artifacts > Connect to Feed > NuGet.exe
Copy the provided XML configuration and save it as nuget.config in the Tools/Build directory as specified in the repository structure.
<?xml version="1.0" encoding="utf-8"?>
<configuration>
  <packageSources>
    <clear />
    <add key="D365FO_Org" value="https://pkgs.dev.azure.com/D365FO_Org/_packaging/D365FO_Org/nuget/v3/index.json" />
  </packageSources>
</configuration>
Step 5: Publish NuGet Packages
Open PowerShell and navigate to the directory where you previously downloaded the NuGet packages and nuget.exe tool.
Run the following commands to publish the NuGet packages separately.
Note: In my case I downloaded them to a directory named
D365foNupkg.
cd C:\D365foNupkg

nuget.exe sources Add -Name "D365FO_Org" -Source "https://pkgs.dev.azure.com/D365FO_Org/_packaging/D365FO_Org/nuget/v3/index.json"

nuget.exe push -Source "D365FO_Org" -ApiKey az Microsoft.Dynamics.AX.Application1.DevALM.BuildXpp.10.0.2790.83.nupkg

nuget.exe push -Source "D365FO_Org" -ApiKey az Microsoft.Dynamics.AX.Application2.DevALM.BuildXpp.10.0.2790.83.nupkg

nuget.exe push -Source "D365FO_Org" -ApiKey az Microsoft.Dynamics.AX.ApplicationSuite.DevALM.BuildXpp.10.0.2790.83.nupkg

nuget.exe push -Source "D365FO_Org" -ApiKey az Microsoft.Dynamics.AX.Platform.CompilerPackage.7.0.8199.55.nupkg

nuget.exe push -Source "D365FO_Org" -ApiKey az Microsoft.Dynamics.AX.Platform.DevALM.BuildXpp.7.0.8199.55.nupkg
Once the NuGet packages have been published sucessfully you can find them in Azure DevOps Artifacts.
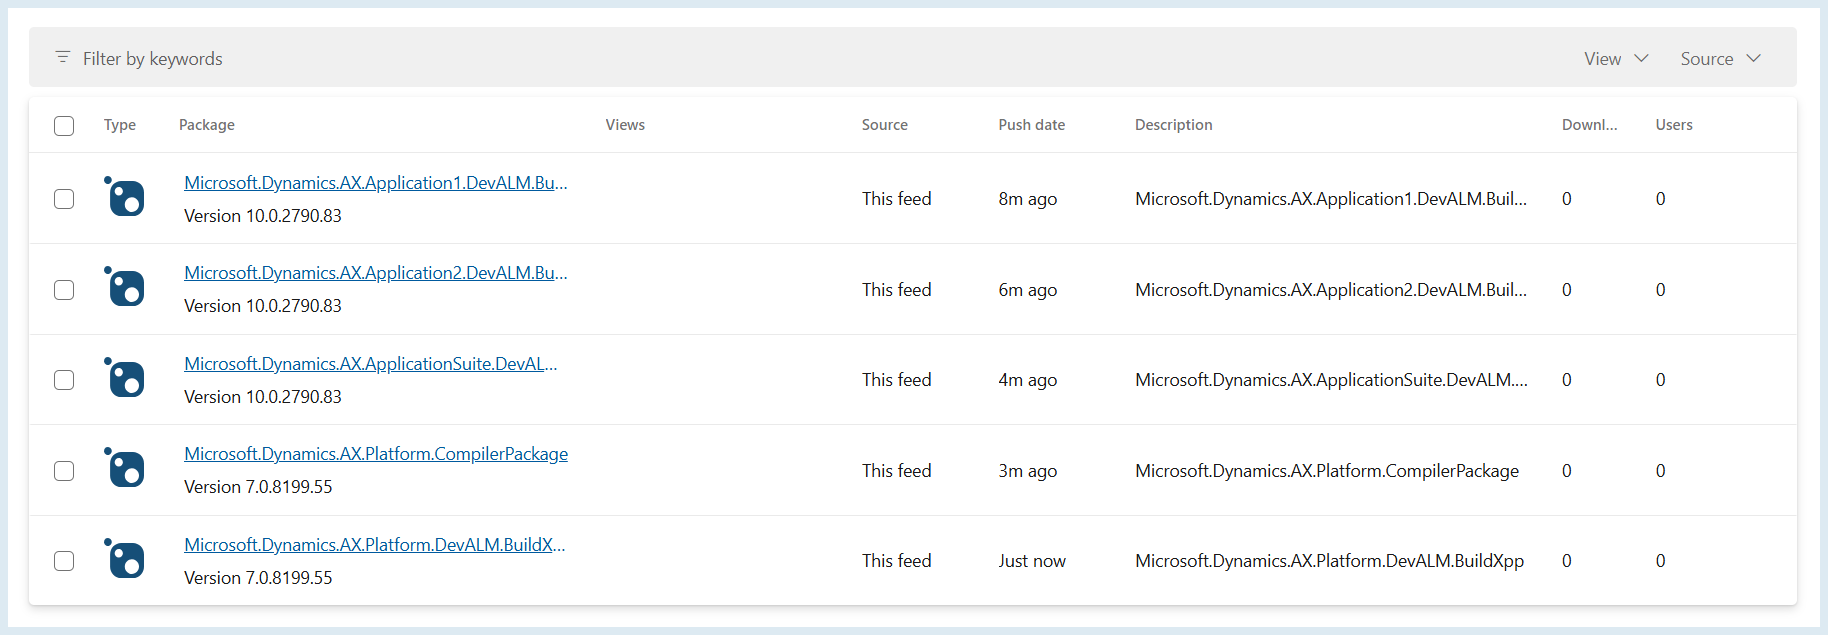
To use the NuGet packages required for the X++ build in the build pipeline copy the following XML code and save it as packages.config in the Tools/Build directory as specified in the repository structure.
<?xml version="1.0" encoding="utf-8"?>
<packages>
  <package id="Microsoft.Dynamics.AX.Platform.DevALM.BuildXpp" version="7.0.8199.55" targetFramework="net40" />
  <package id="Microsoft.Dynamics.AX.Platform.CompilerPackage" version="7.0.8199.55" targetFramework="net40" />
  <package id="Microsoft.Dynamics.AX.ApplicationSuite.DevALM.BuildXpp" version="10.0.2790.83" targetFramework="net40" />
  <package id="Microsoft.Dynamics.AX.Application1.DevALM.BuildXpp" version="10.0.2790.83" targetFramework="net40" />
  <package id="Microsoft.Dynamics.AX.Application2.DevALM.BuildXpp" version="10.0.2790.83" targetFramework="net40" />
</packages>
Install Extensions for Azure Devops
As mentioned earlier we are going to set up two types of pipelines in Azure DevOps:
-
Continuous Integration (CI): Builds the X++ packages.
-
Continuous Delivery (CD): Deploys the built X++ packages across multiple environments.
To configure these pipelines we need to install the following extensions from the Visual Studio Marketplace.
1. Dynamics 365 Finance and Operations Tools
This extension provides the tasks required to build X++ packages in the CI pipeline.
Download Dynamics 365 Finance and Operations Tools
2. Power Platform Build Tools
This extension provides the necessary tasks to deploy X++ packages to Dynamics 365 Finance and Operations environments through Power Platform (PPAC). These tasks are primarily used in the Continuous Delivery (CD) pipeline.
Download Power Platform Build Tools
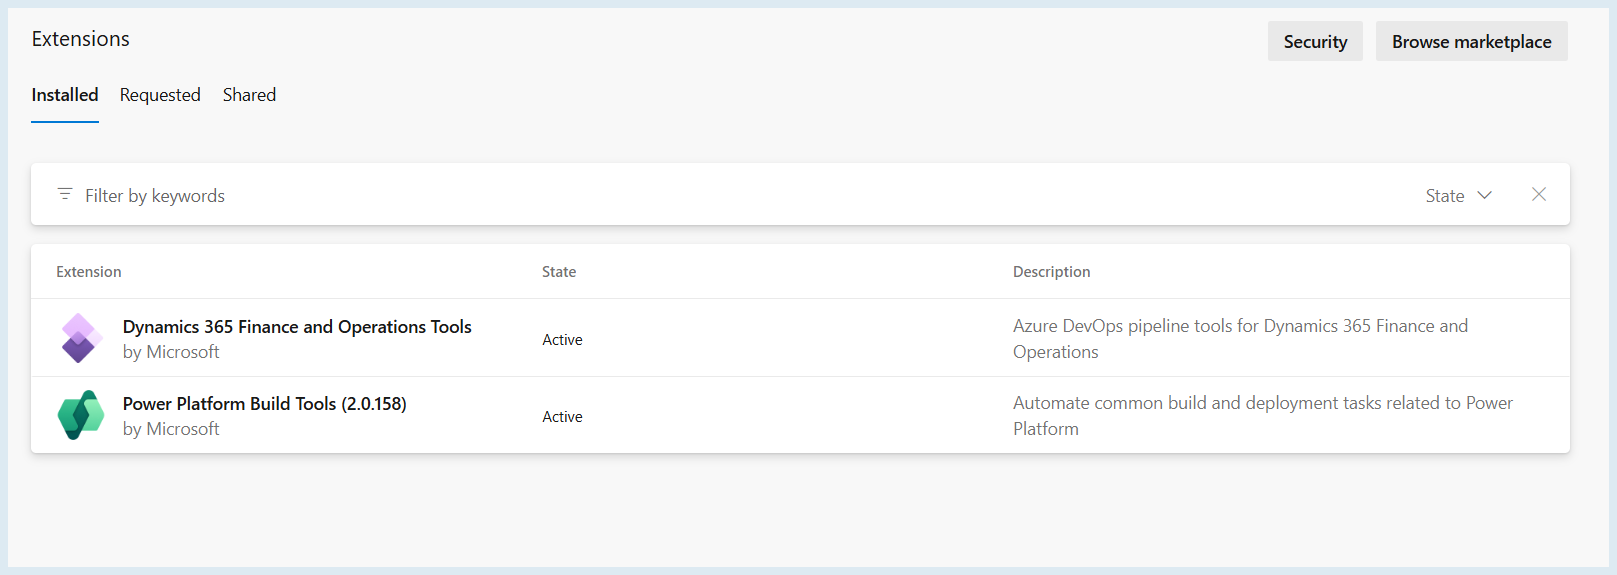
Once both extensions have been installed successfully you can find them in your Azure DevOps organization navigate to:
Azure DevOps > Organization Settings > Extensions
Service connections
To deploy packages from Azure DevOps pipelines to Power Platform environments the pipeline needs a service connection. It stores the authentication details so the pipeline can sign in and deploy without hardcoding secrets in the pipeline YAML code. We are going to create two service connections one for the Test (UAT) environment and one for the Production environment.
Step 1: Register Application in Microsoft Entra ID
Open Azure Portal, in the Azure portal navigate to:
Microsoft Entra ID > App registrations > New registration
Next create an app registration for example D365FO-PPAC-APP then under API permissions add the following permissions:
- Dynamics CRM
- user_impersonation (Delegated)
Finally, Grant Admin consent for the configured API permissions.
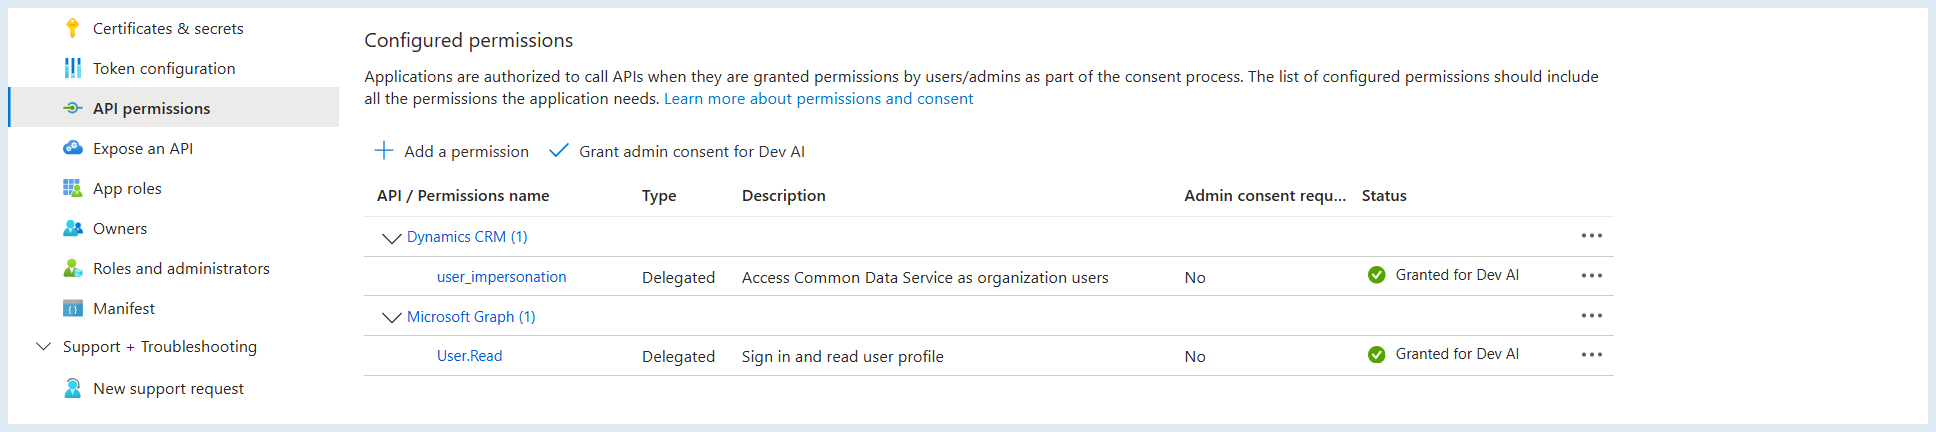
Next go to Certificates & secrets > New client secret give it a name and expiry then copy the secret value we will use it later in Azure DevOps when creating the service connection.
Step 2: Create New Application User in Power Platform
Sign in to the Power Platform admin center
In the Power Platform Admin Center (PPAC) open the environment where you want to deploy the package.
Navigate to:
Settings > Users + permissions > Application users > + New app user
Click + Add an app to select the registered Microsoft Entra application created for this purpose and then click Add.
Under Business Unit select a business unit from the dropdown list.
Finally assign the System Administrator security role and click Save.
Step 3: Create New Service Connection in Azure DevOps
Open your Azure DevOps project and navigate to:
Project Settings > Service connections
Click New service connection search for Power Platform select it and click Next.
On the New Power Platform service connection page configure the following settings:
1. Authentication Method
Select Application Id and client secret as the authentication method.
2. Server URL
Enter the URL of the target Power Platform environment to which you want to deploy the X++ packages for example (https://d365fo-uat.crm17.dynamics.com)
3. Authentication Details
Fill in the following information from your Microsoft Entra application registration:
- Tenant Id: Enter your Microsoft Entra tenant ID (Directory ID).
- Application Id: Enter the Application (client) ID of the registered Microsoft Entra application.
- Client secret of Application Id: Enter the client secret value associated with the registered application.
4. Service Connection Details
Configure the service connection details:
-
Service Connection Name: Enter a descriptive name for your service connection. For example
Power-Platform-TestorPower-Platform-Production. -
Description: Optionally provide a description of the service connection.
5. Security
Make sure to select Grant access permission to all pipelines.
Finally click Save to create the service connection.
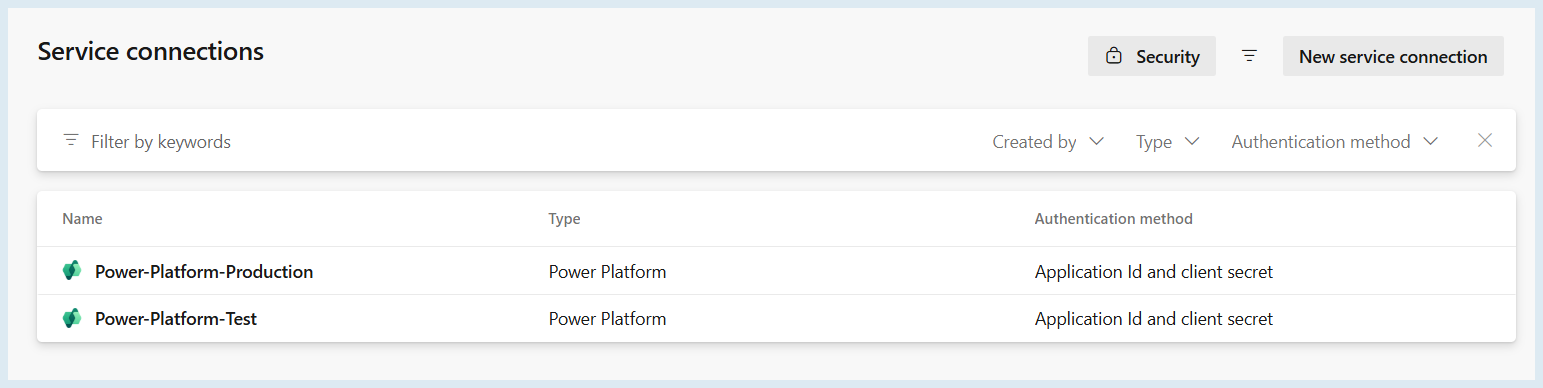
Note: Repeat these steps for each target environment if you are deploying packages across multiple environments
Build the Continuous Integration (CI) Pipeline
In this section we will create a new pipeline in Azure DevOps based on the diagram below illustrates the build pipeline we are going to implement for compiling X++ customizations and generating deployable packages for D365 F&O Unified Environments.
Azure DevOps supports two types of pipelines: YAML and Classic. Because of we are using Git for source control we will use YAML pipelines to define, configure, and manage our CI/CD process directly through code.
An Azure DevOps YAML pipeline consists of several key components, including settings, variables, stages, jobs, steps, and tasks. These components work together to define and automate the CI/CD process, from compiling and packaging the source code to deploying the generated packages across different environments.
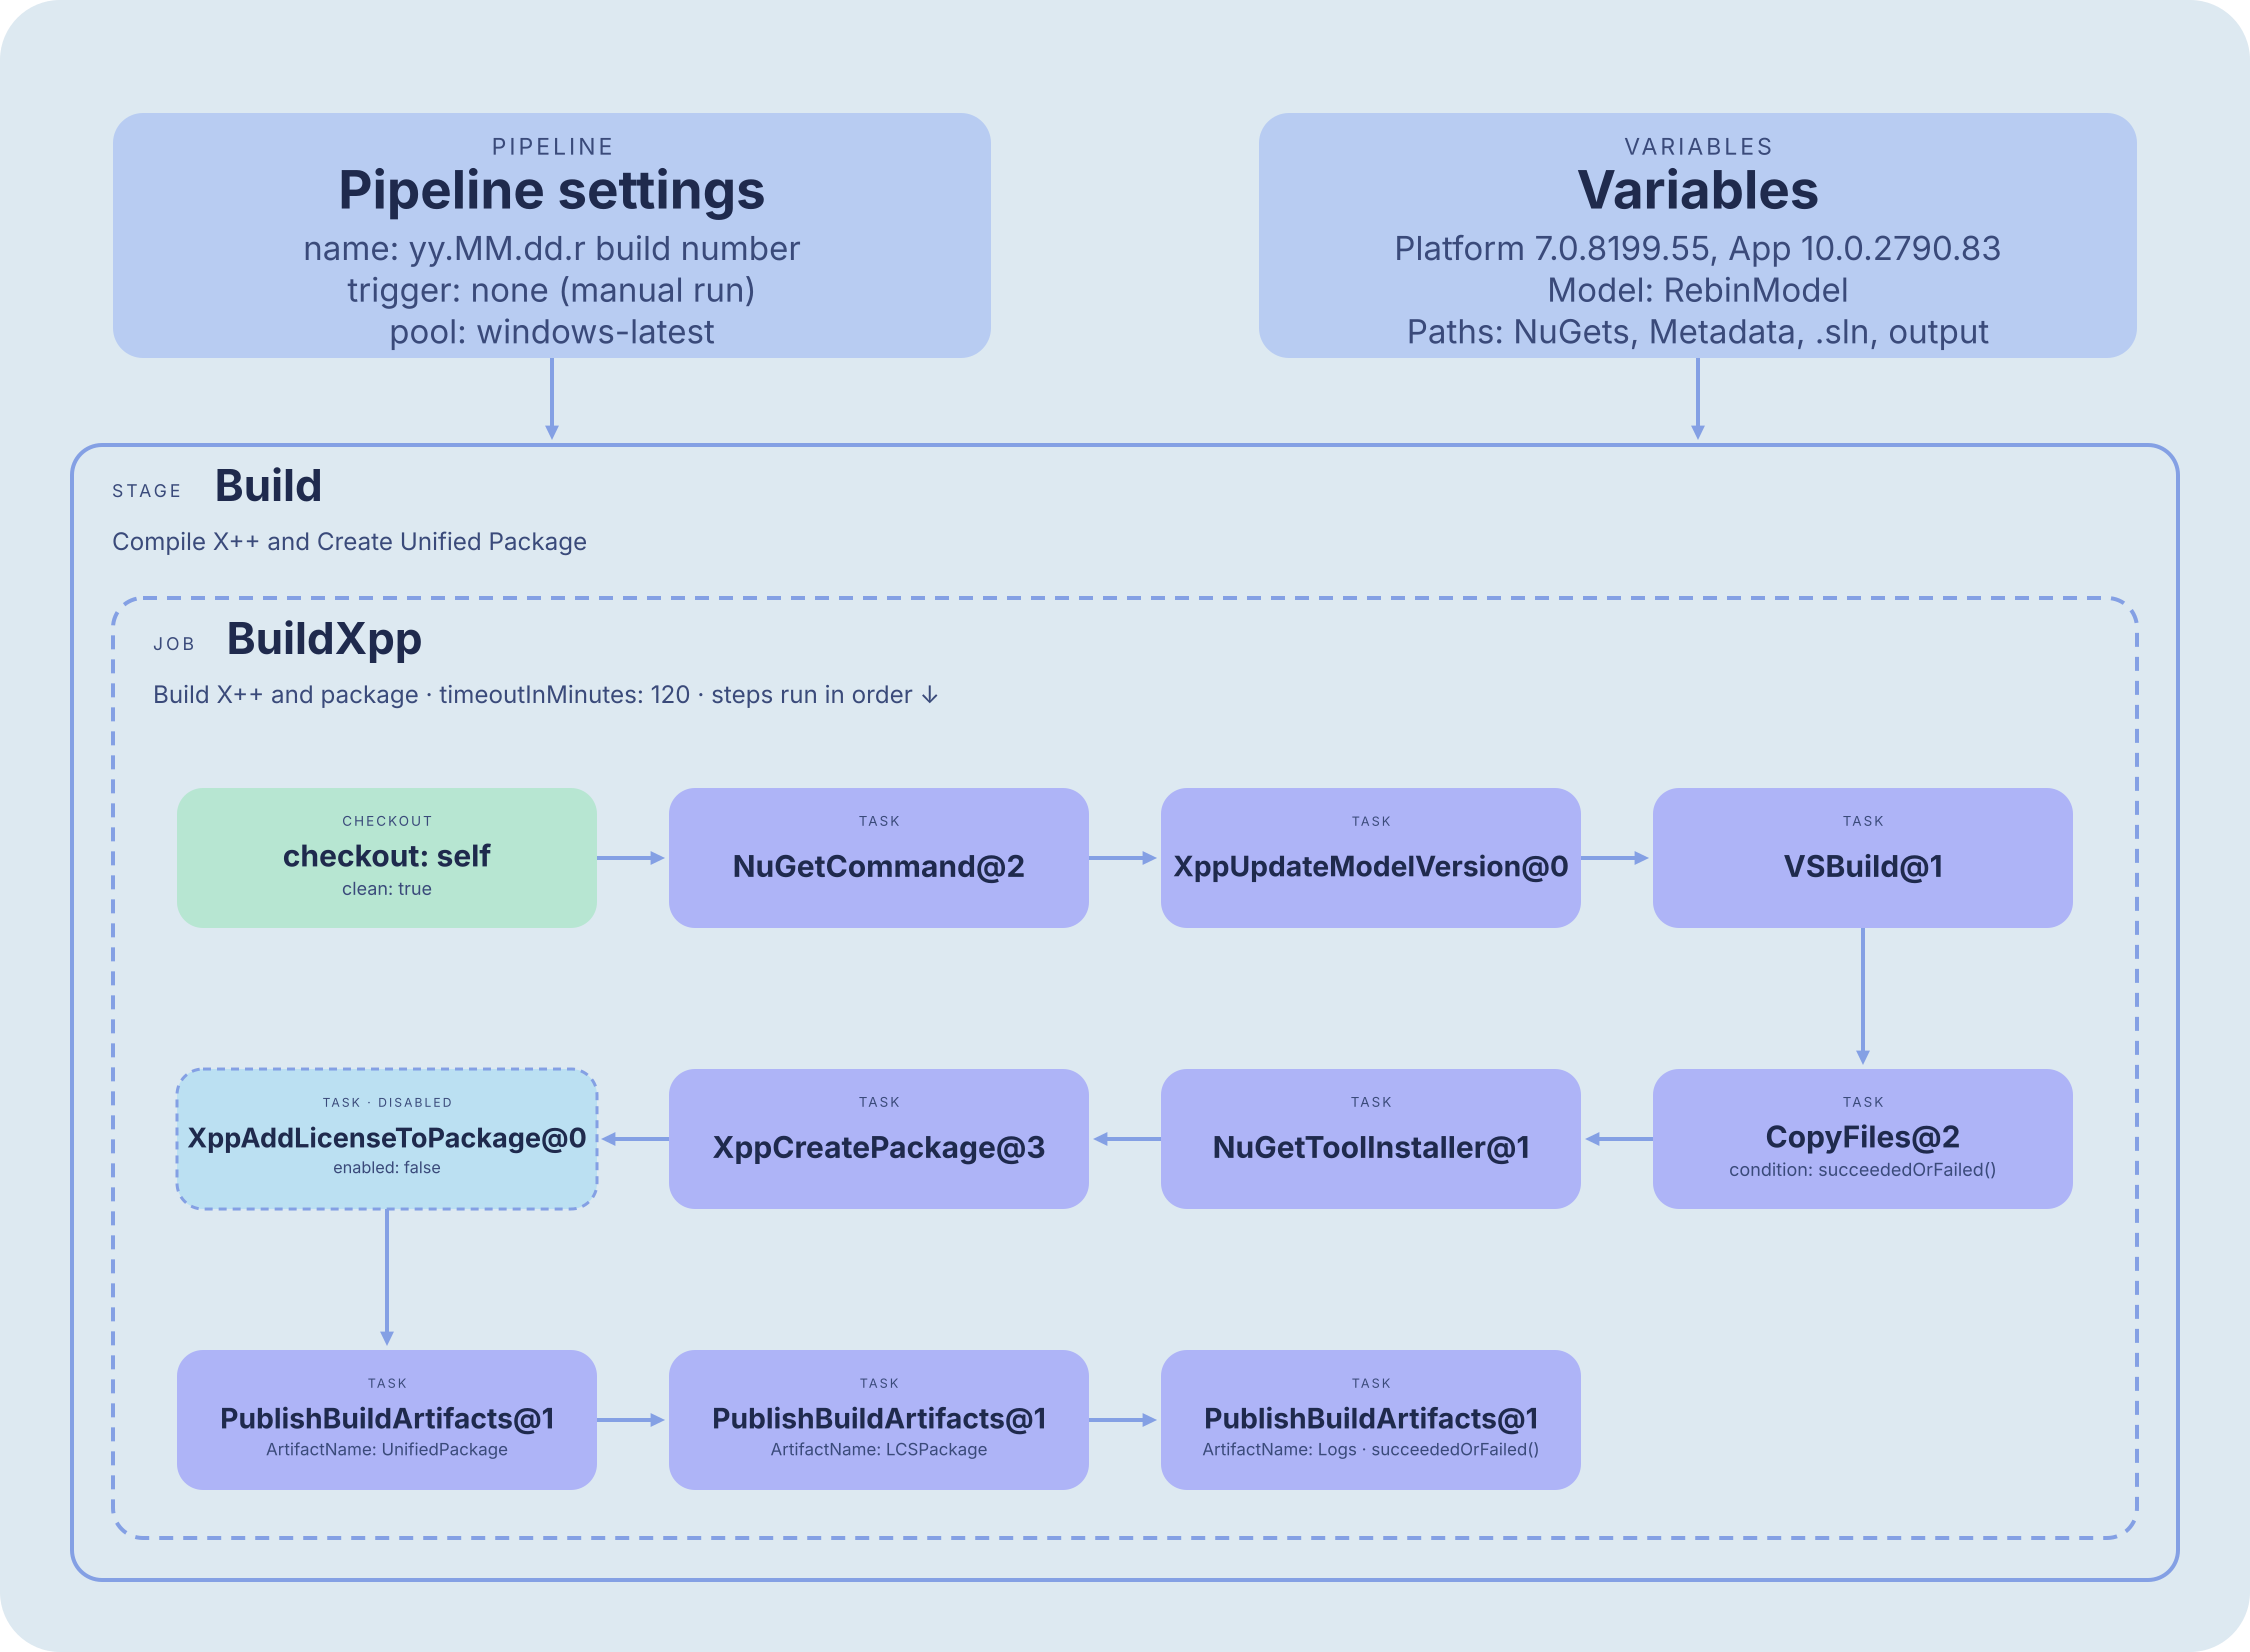
Before diving into the complete pipeline implementation let’s explore each of these components individually to understand their purpose and how they work together.
1. Pipeline settings
name: $(Date:yy.MM.dd)$(Rev:.r)
trigger: none
pool:
 vmImage: 'windows-latest'
name: $(Date:yy.MM.dd)$(Rev:.r) : Autoamtically generate a uniqe name for each pipline run using current data time and revision number for example: 26.11.10.1.
trigger: none: Disable autoamtic pipline excution when changes are pushed to the repository Main branch.
pool: vmImage: 'windows-latest': We use latest Microsoft hosted (Windows Image) build agent that Azure DevOps uses to run and excute the pipline.
2. Variables
variables:
 # -- NuGet package versions --
 PlatformVersion: '7.0.8199.55'
 ApplicationVersion: '10.0.2790.83'

 # -- Custom Model name --
 ModelName: 'RebinModel'

 # -- Paths --
 NuGetConfigPath: '$(Build.SourcesDirectory)/Tools/Build'
 NuGetInstallDir: '$(Build.SourcesDirectory)/NuGets'
 MetadataPath: '$(Build.SourcesDirectory)/Metadata'
 SolutionPath: '$(Build.SourcesDirectory)/Projects/FinanceOperations/FinanceOperations.sln'

 # -- NuGet package folder names (using -ExcludeVersion for stable paths) --
 CompilerPackage: '$(NuGetInstallDir)/Microsoft.Dynamics.AX.Platform.CompilerPackage'
 PlatformBuildRef: '$(NuGetInstallDir)/Microsoft.Dynamics.AX.Platform.DevALM.BuildXpp'
 App1BuildRef: '$(NuGetInstallDir)/Microsoft.Dynamics.AX.Application1.DevALM.BuildXpp'
 App2BuildRef: '$(NuGetInstallDir)/Microsoft.Dynamics.AX.Application2.DevALM.BuildXpp'
 AppSuiteBuildRef: '$(NuGetInstallDir)/Microsoft.Dynamics.AX.ApplicationSuite.DevALM.BuildXpp'

 # -- Unified package output --
 UnifiedPackageOutput: '$(Build.ArtifactStagingDirectory)/UnifiedPackage'
In this section we define variables that are used in the Azure DevOps pipeline because we don’t want to repeat package versions, folder paths, and the model name in multiple tasks.
-
PlatformVersion: this is the Platform update version of D365 F&O. -
ApplicationVersion: this is the Application version of D365 F&O.
Note: PlatformVersion & ApplicationVersion should be equal to or lower than the version of the enviroment (UAT/Production) we deploy to.
-
ModelName: 'RebinModel': name of the custom D365 F&O model that contains X++ customizations. -
NuGetConfigPath: where packages.config and nuget.config live (what to install) -
NuGetInstallDir: where the NuGet packages get installed -
MetadataPath: our X++ source/model folder -
SolutionPath: the .sln file that gets compiled for example (FinanceOperations.sln) -
CompilerPackage:contains x++ compiler and build tools -
PlatformBuildRef: compiled reference metadata/assemblies for the Platform layer (Application Platform, Application Foundation models). -
App1BuildRefandApp2BuildRef: contains the compiled application reference models. Microsoft split the standard application package into two parts (Application1 and Application2) to bypass Azure Artifacts feed file size limits. -
AppSuiteBuildRef: contains the compiled reference metadata for the Application Suite layer. -
UnifiedPackageOutput: specifies the output directory where the generated Unified Deployment Package will be stored.
3. Stages
stages:
  - stage: Build
    displayName: 'Compile X++ and Create Unified Package'
After defining all the variables we create the first stage of the Azure DevOps pipeline called Build this stage is responsible for compiling the X++ customizations and contains all the jobs, steps, and tasks required to execute the build process.
4. Jobs
jobs:
  - job: BuildXpp
    displayName: 'Build X++ and package'
    timeoutInMinutes: 120
Inside the Build stage we create a job called BuildXpp which contains a collection of steps. The timeoutInMinutes property specifies the maximum execution time for the job which is set to 120 minutes.
5. Steps
steps:
  - checkout: self
    clean: true
This step pulls repository source onto the agent with a clean workspace.
6. Install the NuGet packages (NuGetCommand@2)
- task: NuGetCommand@2
  displayName: 'Restore NuGet build packages'
  inputs:
    command: 'custom'
    arguments: >
      install "$(NuGetConfigPath)/packages.config"
      -ConfigFile "$(NuGetConfigPath)/nuget.config"
      -OutputDirectory "$(NuGetInstallDir)"
      -ExcludeVersion
      -Verbosity Detailed
      -Noninteractive
This task NuGetCommand@2 used to pack or restore NuGet packages, this task uses NuGet.exe tool with its arguments to downloads the NuGet build packages listed in packages.config from the private feed in nuget.config and installs them into $(NuGetInstallDir) directory without version number, include detaile logs and no interactive.
7. Update the model version (XppUpdateModelVersion@0)
- task: XppUpdateModelVersion@0
  displayName: 'Update Model Version'
  inputs:
    XppSourcePath: '$(MetadataPath)'
    XppDescriptorSearch: '$(MetadataPath)/$(ModelName)/Descriptor/*.xml'
    XppLayer: 10
    VersionNumber: '$(Build.BuildNumber)'
This task XppUpdateModelVersion@0 used to updates the version of your D365 F&O model to match the pipeline’s build number. It finds the model descriptor XML (MetadataPath)/$(ModelName)/Descriptor/*.xml and sets its version to $(Build.BuildNumber), so the compiled package carries the same version as the build.
8. Build the solution (VSBuild@1)
- task: VSBuild@1
  displayName: 'Build X++ solution'
  inputs:
    solution: '$(SolutionPath)'
    vsVersion: '17.0'
    msbuildArgs: >
      /p:BuildTasksDirectory="$(CompilerPackage)/DevAlm"
      /p:MetadataDirectory="$(MetadataPath)"
      /p:FrameworkDirectory="$(CompilerPackage)"
      /p:ReferenceFolder="$(PlatformBuildRef)/ref/net40;$(App1BuildRef)/ref/net40;$(App2BuildRef)/ref/net40;$(AppSuiteBuildRef)/ref/net40;$(MetadataPath);$(Build.BinariesDirectory)"
      /p:ReferencePath="$(CompilerPackage)"
      /p:OutputDirectory="$(Build.BinariesDirectory)"
      /p:CompilerMetadata="$(Build.BinariesDirectory)"
This task VSBuild@1 used to compile X++ code using MSBuild.exe tool (Visual Studio 2022, vsVersion: 17.0) against the solution in $(SolutionPath). It uses the compiler package and the standard D365 F&O reference packages, and outputs the compiled binaries to $(Build.BinariesDirectory) directory.
9. Copy X++ compile log files (CopyFiles@2)
- task: CopyFiles@2
  displayName: 'Copy X++ compile log files'
  inputs:
    SourceFolder: '$(Build.SourcesDirectory)'
    Contents: |
      **\Dynamics.AX.*.xppc.*
      **\Dynamics.AX.*.labelc.*
      **\Dynamics.AX.*.reportsc.*
    TargetFolder: '$(Build.ArtifactStagingDirectory)/Logs'
  condition: succeededOrFailed()
This task CopyFiles@2 copies the X++ compiler log files (code, label, and report compile logs) from the sources folder $(Build.SourcesDirectory) into $(Build.ArtifactStagingDirectory)/Logs, so they can be published and reviewed.
10. Install NuGet 3.3.0 (NuGetToolInstaller@1)
- task: NuGetToolInstaller@1
  displayName: 'Install NuGet 3.3.0 for packaging'
  inputs:
    versionSpec: '3.3.0'
This task NuGetToolInstaller@1 installs nuget.exe tool version 3.3.0 on the Azure DevOps build agent.
11. Create the Power Platform unified package (XppCreatePackage@3)
- task: XppCreatePackage@3
  displayName: 'Create Power Platform unified package'
  inputs:
    XppToolsPath: '$(CompilerPackage)'
    CreateCloudPackage: true
    CloudPackagePlatVersion: '$(PlatformVersion)'
    CloudPackageAppVersion: '$(ApplicationVersion)'
    CloudPackageOutputLocation: '$(UnifiedPackageOutput)'
    DeployablePackagePath: '$(Build.ArtifactStagingDirectory)/AXDeployableRuntime.zip'
This task XppCreatePackage@3 used to create a Power Platform Unified Deployment Package for D365 F&O and LCS deployable package using the compiled X++ customizations and the specified platform and application versions. It saves the generated package to the directory defined by $(UnifiedPackageOutput) for publishing as a build artifact.
12. Add ISV License (XppAddLicenseToPackage@0)
- task: XppAddLicenseToPackage@0
  displayName: 'Add Licenses to Deployable Package'
  enabled: false
This task XppAddLicenseToPackage@0 is used to add license files (e.g., ISV or custom licenses) to the deployable package so they are deployed together with your code. In this case, the task has been disabled.
13. Publish build artifacts
- task: PublishBuildArtifacts@1
  displayName: 'Publish unified package artifact'
  inputs:
    PathtoPublish: '$(UnifiedPackageOutput)'
    ArtifactName: 'UnifiedPackage'

- task: PublishBuildArtifacts@1
  displayName: 'Publish deployable runtime package artifact'
  inputs:
    PathtoPublish: '$(Build.ArtifactStagingDirectory)/AXDeployableRuntime.zip'
    ArtifactName: 'LCSPackage'

- task: PublishBuildArtifacts@1
  displayName: 'Publish compile logs'
  inputs:
    PathtoPublish: '$(Build.ArtifactStagingDirectory)/Logs'
    ArtifactName: 'Logs'
  condition: succeededOrFailed()
These three PublishBuildArtifacts@1 tasks used to publish the build outputs as separate artifacts in Azure DevOps so they can be downloaded or used by the Continuous Delivery (CD) pipeline.
- UnifiedPackage: the Power Platform unified package folder.
- LCSPackage: AXDeployableRuntime.zip the standard deployable package.
- Logs: Publishes the X++ compilation logs for troubleshooting and debugging.
Note: you can find the complete Azure DevOps Continuous Integration (CI) YAML code in this GitHub Repository .
To get started, navigate to your Azure DevOps project from the left hand navigation menu select Pipelines > New Pipeline > Azure Repos Git.
Select a repository for example my own called D365FO then select
Configure your pipeline > Existing Azure Pipelines YAML file
In our repository structure the CI pipeline lives at this path: D365FO\Tools\Pipelines\ci.yaml.
Note: We use two branches
Dev-01andmain. All development changes are made in theDev-01branch then pushed and merged into themainbranch through pull requests. Both branches have the same directory structure.
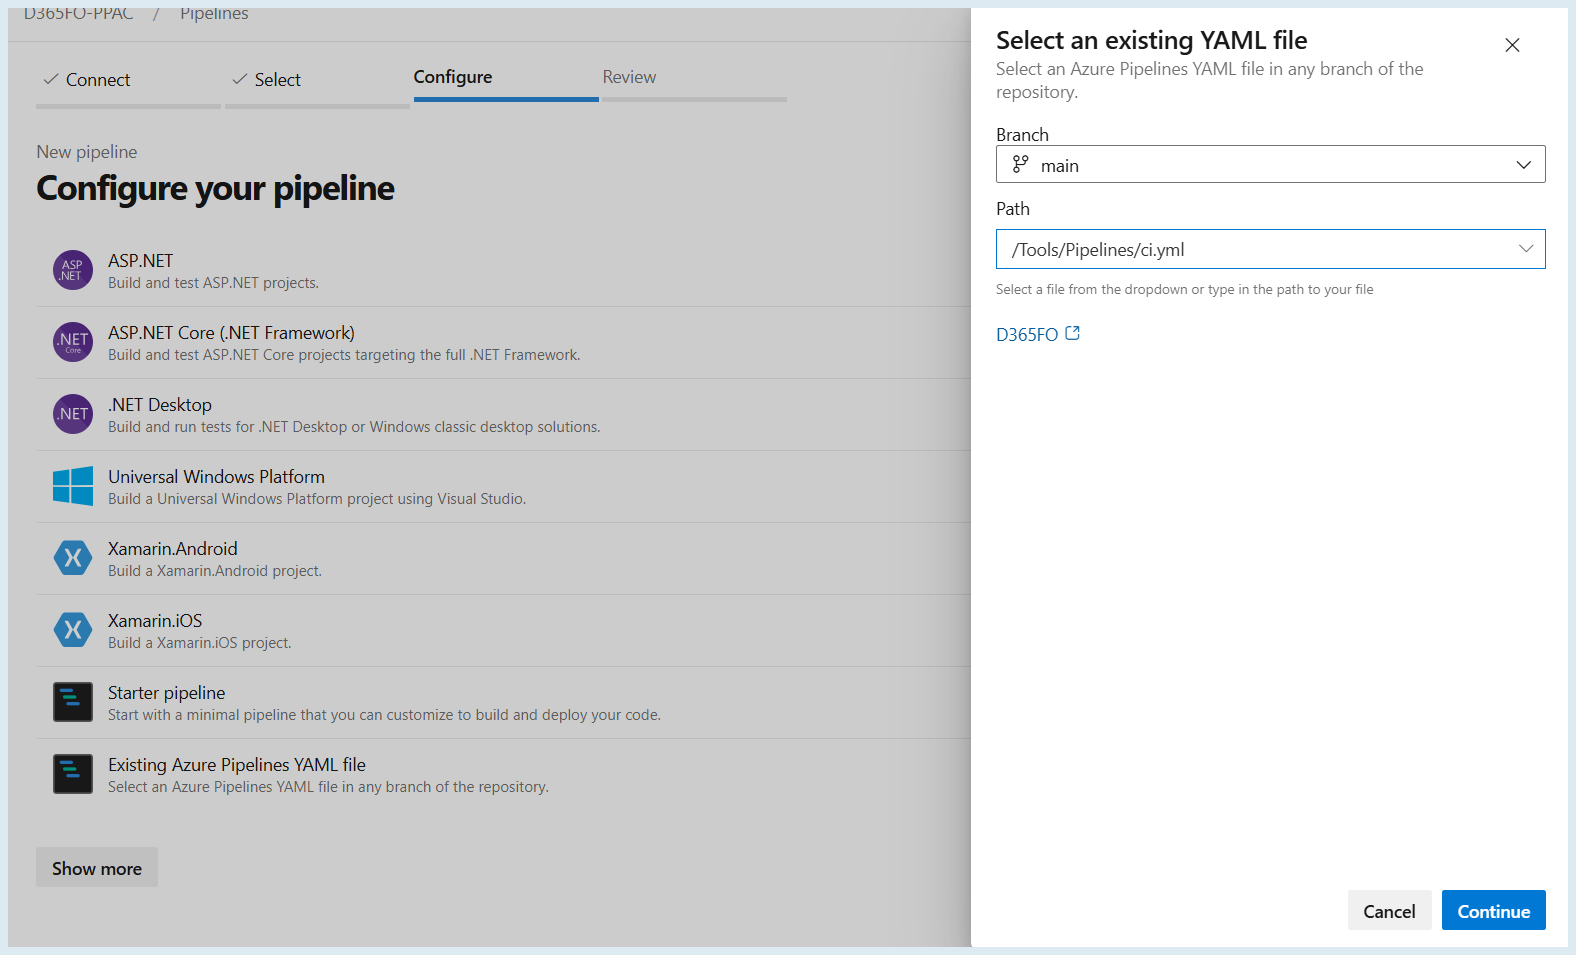
Click Continue > Run Pipeline then wait for all jobs and tasks in the pipeline to complete this process may take some time. Once all jobs and tasks have completed successfully the CI pipeline will display the results as shown in the image below.
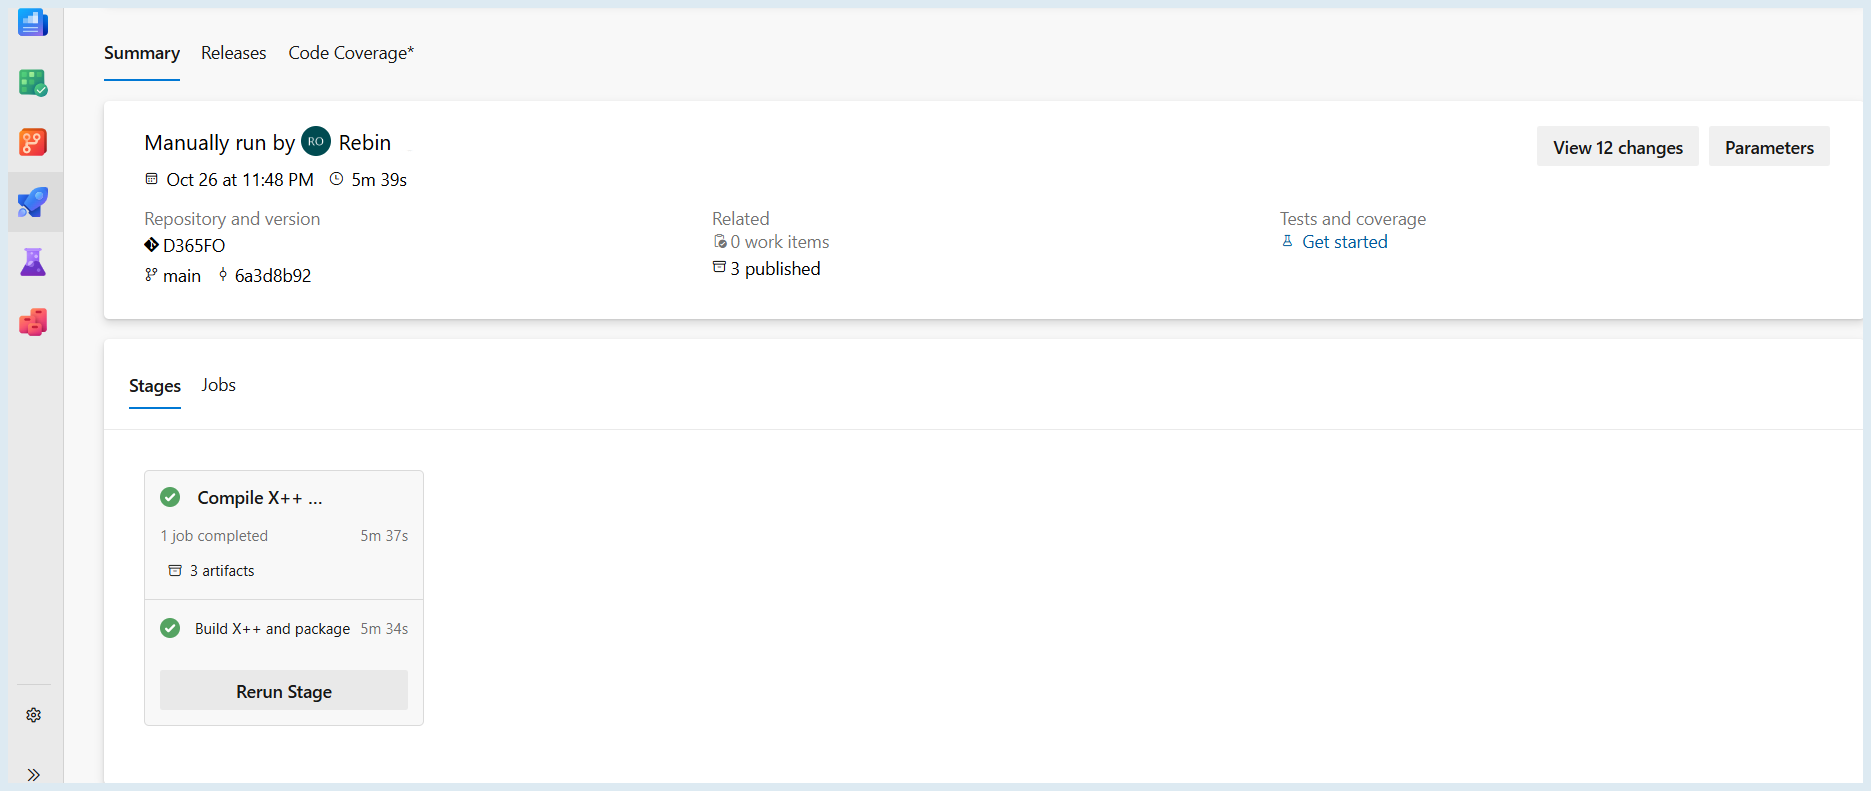
Here is important part is the 3 Published or (Artifacts published) if you click on it you will find out the below artifacts.
-
LCSPackage: AXDeployableRuntime.zip
-
Logs: Project build logs.
-
UnifiedPackage: PackageAssets > TemplatePackage.dll
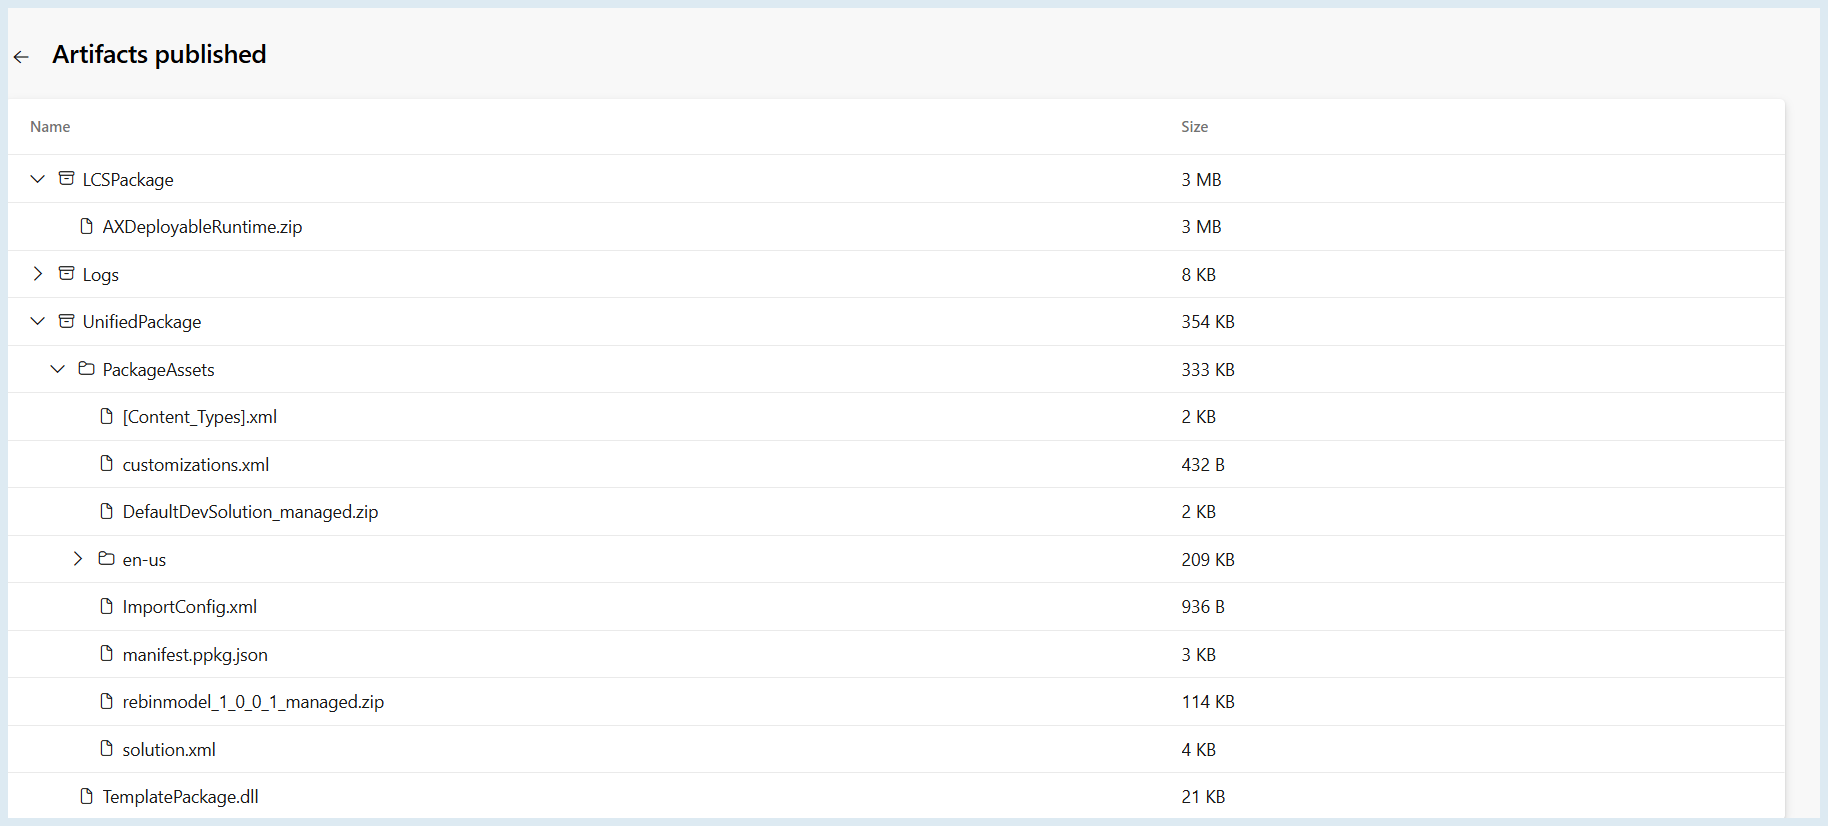
Note: The
TemplatePackage.dllfile is particularly important because it is required by the second pipeline (CD pipeline) to deploy the package to the Unified Environments (PPAC).
Build the Continuous Delivery (CD) Pipeline
In order to automate the deployment of Unified Packages between mutiple environments (PPAC) such as Test (UAT) and Production, we will build a new pipeline for Continuous Delivery (CD) in Azure DevOps based on the design below. After the unified package has deployed to UTA it sends a notification email for approval and confirmation to deploy to production. I have set an approval gate for approval by someone.
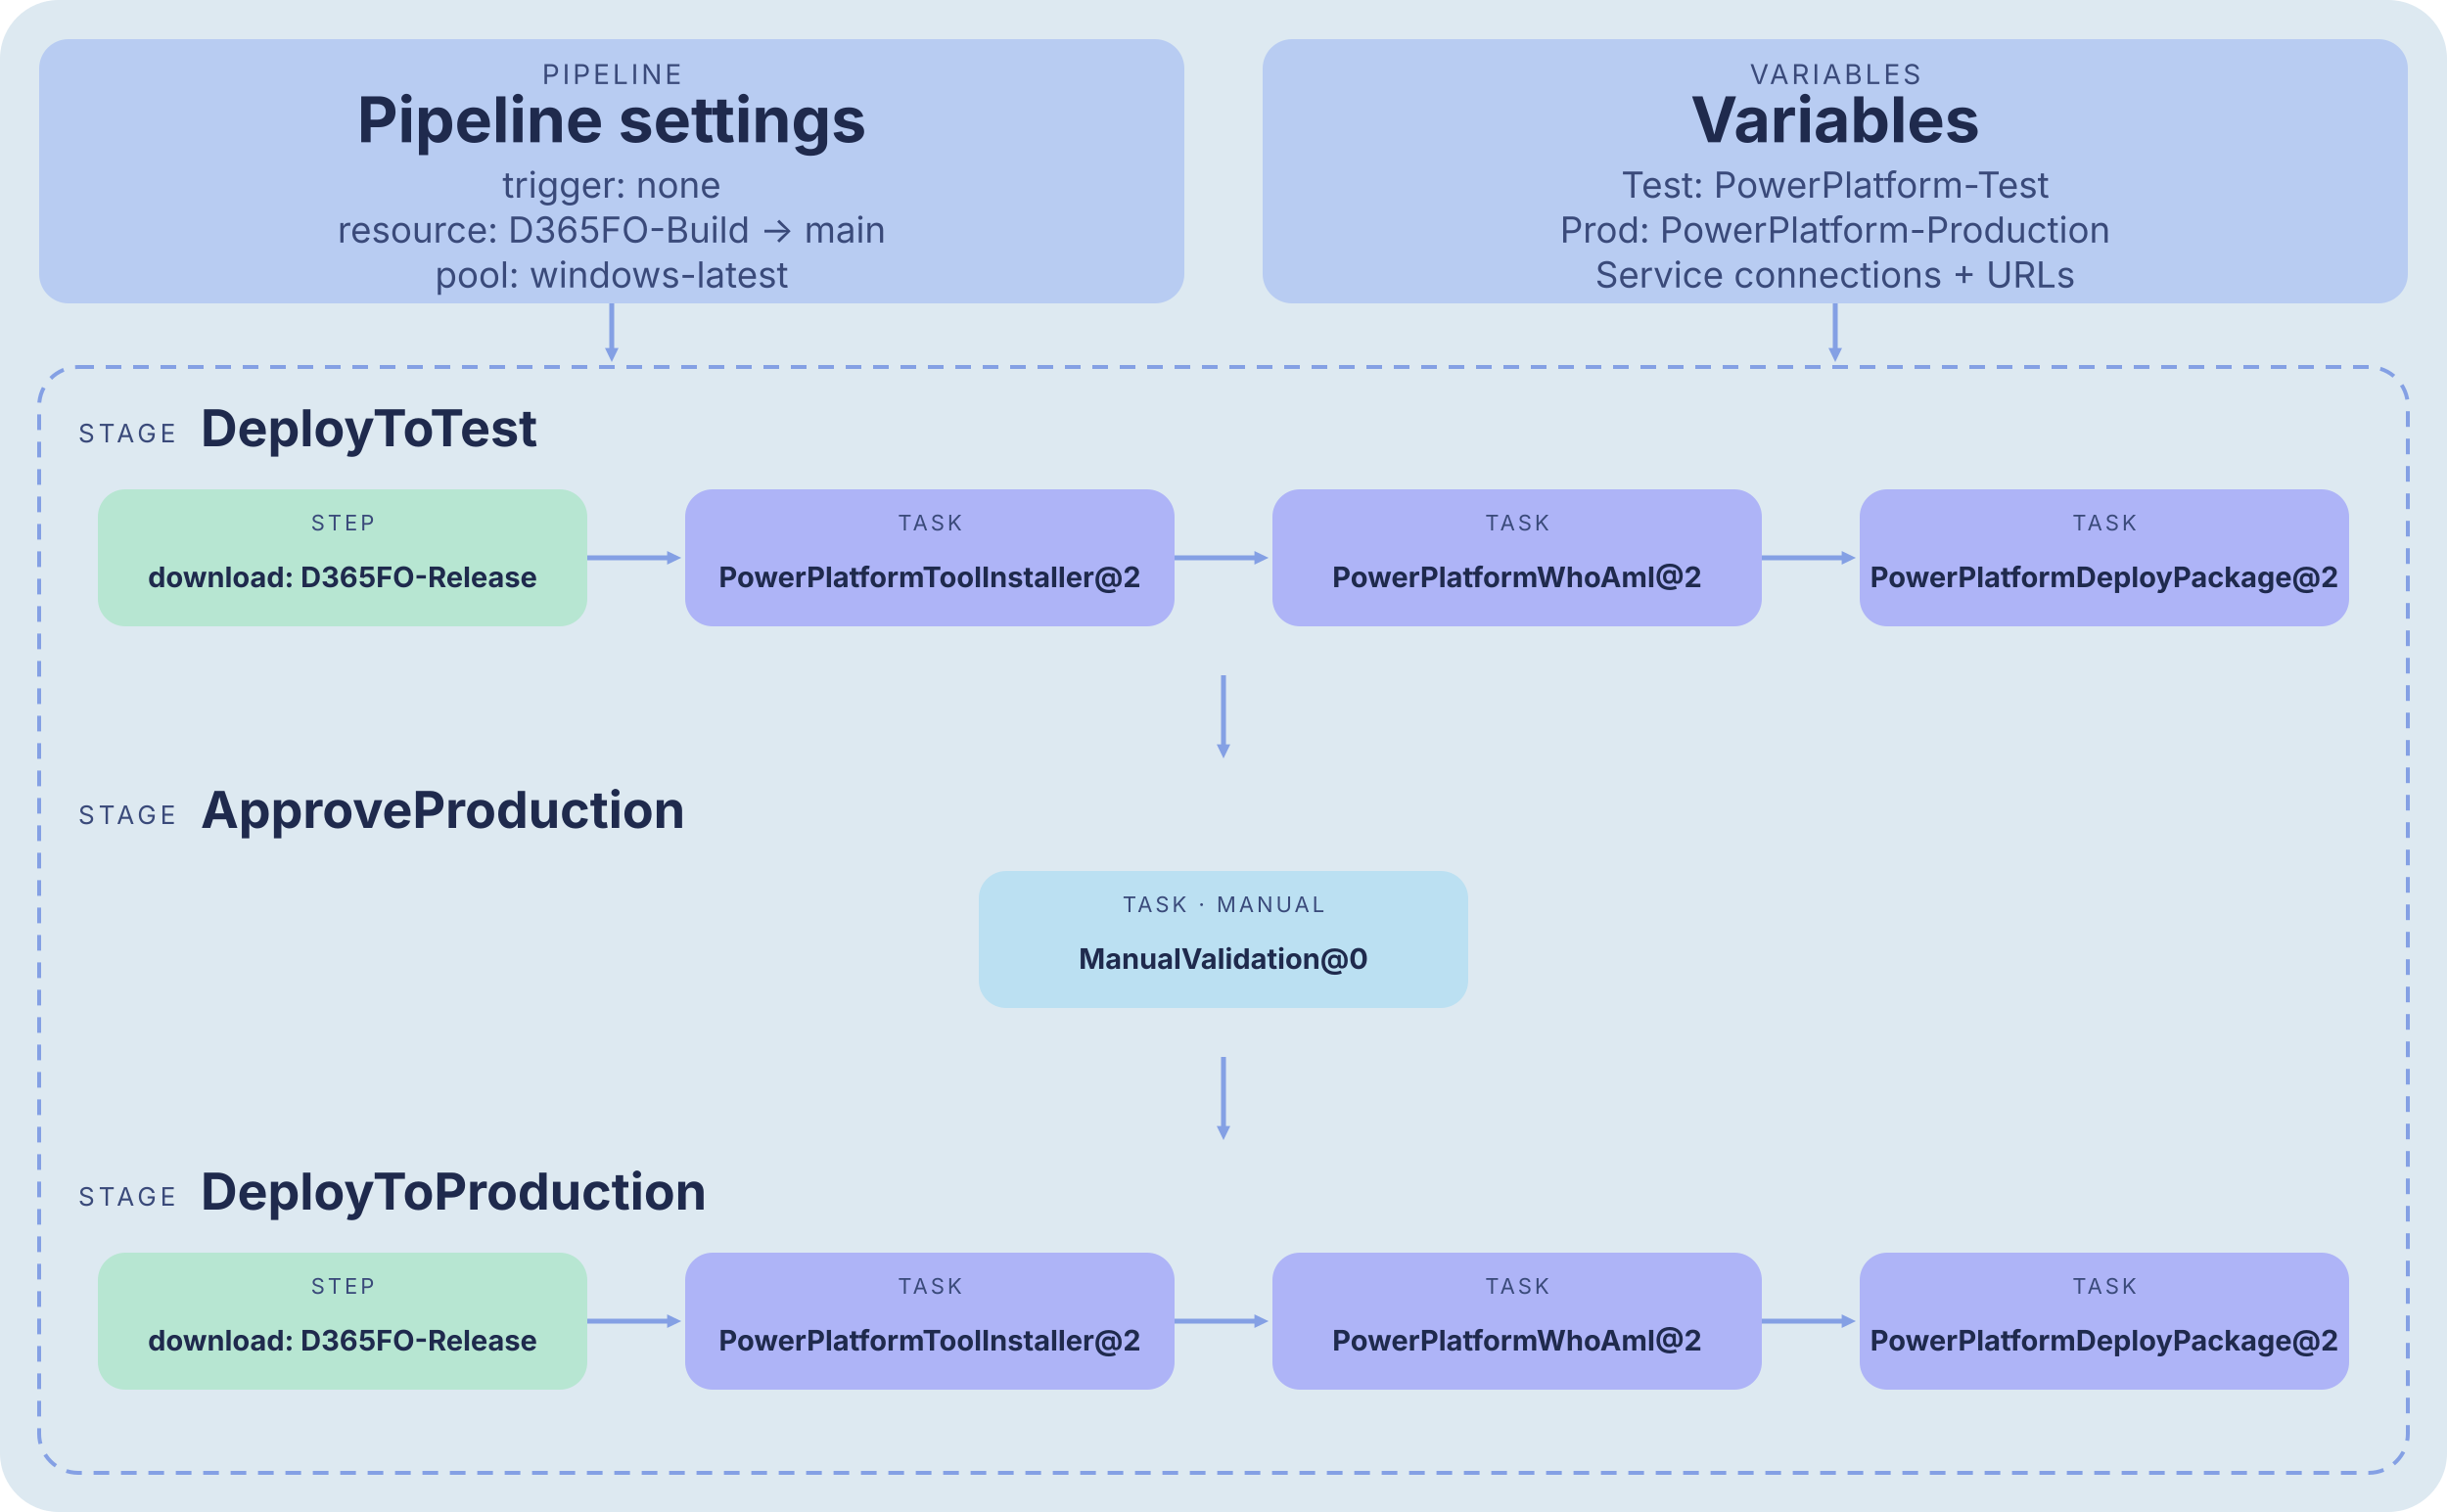
1. Pipeline settings
trigger: none

resources:
  pipelines:
    - pipeline: D365FO-Release
      source: 'D365FO-Build'
      trigger:
        branches:
          include:
            - main

pool:
  vmImage: 'windows-latest'
After the Build pipeline (D365-Biuild) sucessfully complated automatically (D365FO-Release) pipeline will start to deploy the Unified Package to Power Platfrom Unified enviroments.
2. Variables
variables:
  - name: TestServiceConnection
    value: 'PowerPlatform-Test'
  - name: TestEnvironmentUrl
    value: 'https://d365fo-uat.crm17.dynamics.com'

  - name: ProductionServiceConnection
    value: 'PowerPlatform-Production'
  - name: ProductionEnvironmentUrl
    value: 'https://d365fo-prod.crm17.dynamics.com'
In this section we defined pipeline variables for two target environments Test (UAT) and Production.
-
TestServiceConnection: name of the Azure DevOps service connection (PowerPlatform-Test) used to authenticate to the UAT environment. -
TestEnvironmentUrl: the UAT environment URL. -
ProductionServiceConnection: service connection for prod (PowerPlatform-Production). -
ProductionEnvironmentUrl: the prod environment URL.
3. Stages
stages:
  - stage: DeployToTest
    displayName: 'Deploy to Test'
This stage called DeployToTest is responsible for deploying the Unified Package generated by the Build pipeline to the Test (UAT) Power Platform unified environment.
4. Jobs
jobs:
  - deployment: DeployTest
    displayName: 'Deploy unified package to Test'
    environment: 'Test'
    timeoutInMinutes: 180
    strategy:
      runOnce:
        deploy:
We define this deployment job that deploys the unified package to the Test (UAT) environment.
-
timeoutInMinutes: Sets the maximum job execution time to 180 minutes (3 hours). -
strategy: runOnce: Configures the deployment to run once. -
deploy: Defines the deployment steps that will execute.
4. Steps
steps:
  - download: D365FO-Release
    artifact: 'UnifiedPackage'
    displayName: 'Download unified package artifact'
This is the first step of the deploy job and it downloads the build artifact.
5. Install Power Platform Build Tools
  - task: PowerPlatformToolInstaller@2
    displayName: 'Install Power Platform Build Tools'
This PowerPlatformToolInstaller@2 task installs the Power Platform Build Tools on the agent which required to execute Power Platform deployment tasks in the pipeline.
6. Power Platform Who AmI
  - task: PowerPlatformWhoAmI@2
    displayName: 'Verify Test service connection'
    inputs:
      authenticationType: 'PowerPlatformSPN'
      PowerPlatformSPN: '$(TestServiceConnection)'
This task PowerPlatformWhoAmI@2 verifies the Test environment service connection by authenticating with the configured Service Principal and checking its identity.
7. Power Platform Deploy Package
  - task: PowerPlatformDeployPackage@2
    displayName: 'Deploy unified package to Test'
    inputs:
      authenticationType: 'PowerPlatformSPN'
      PowerPlatformSPN: '$(TestServiceConnection)'
      PackageFile: '$(Pipeline.Workspace)/D365FO-Release/UnifiedPackage/TemplatePackage.dll'
      Environment: '$(TestEnvironmentUrl)'
This PowerPlatformDeployPackage@2 task is the actual deploy step it runs a Package Deployer package (TemplatePackage.dll) against the Test environment.
-
authenticationType: 'PowerPlatformSPN': authenticates with the service principal from $(TestServiceConnection). -
PackageFile: path to TemplatePackage.dll inside the UnifiedPackage artifact and it matches the $(Pipeline.Workspace)/D365FO-Release/UnifiedPackage/ location. -
Environment: '$(TestEnvironmentUrl)': the target environment URL (the Test or UAT URL).
8. Approve Production Deployment Gate
- stage: ApproveProduction
  displayName: 'Approve Production Deployment'
  dependsOn: DeployToTest
  condition: succeeded('DeployToTest')
  jobs:
    - job: WaitForApproval
      displayName: 'Wait for manual approval'
      pool: server
      timeoutInMinutes: 4320
      steps:
        - task: ManualValidation@0
          timeoutInMinutes: 1440
          inputs:
            notifyUsers: |
              [email protected]
            instructions: 'Test deployment succeeded. Verify Test, then Resume to deploy to Production or Reject to cancel.'
            onTimeout: 'reject'
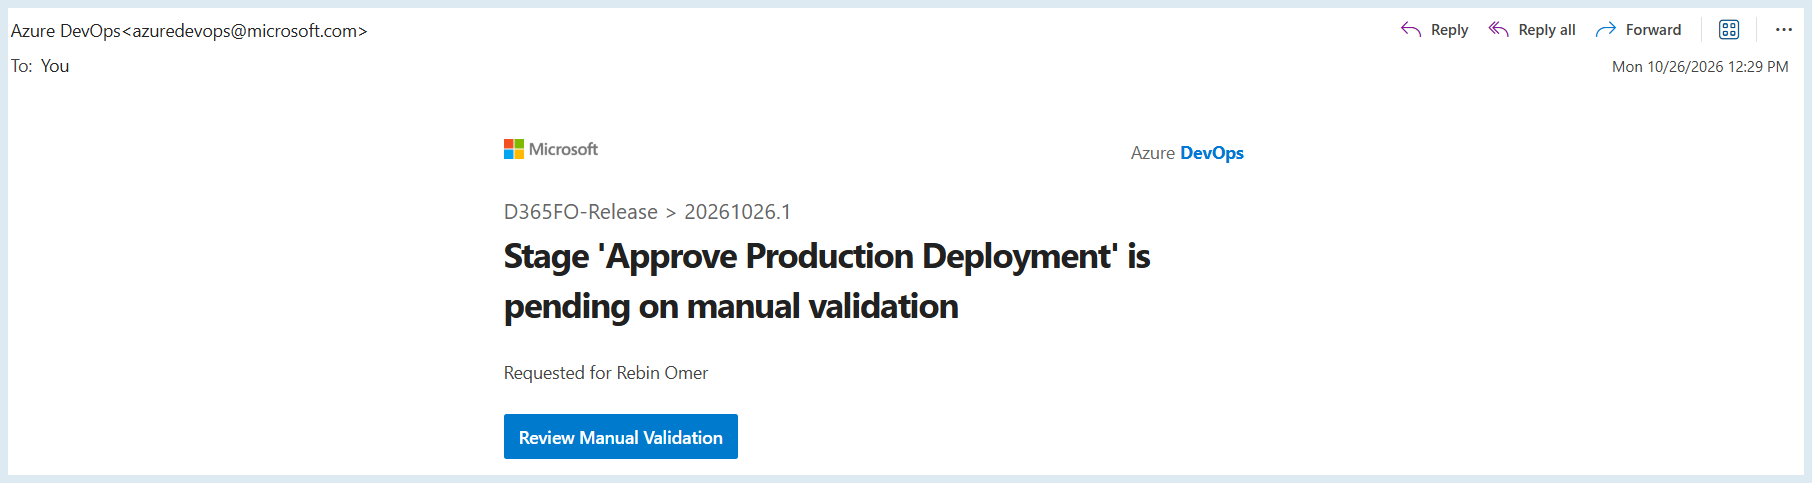
This stage is very important it creates a manual approval that runs only after a successful Test deployment. It notifies the specified user to verify the Test environment and approve or reject the Production deployment if approval times out after 24 hours the deployment is rejected.
9. Deploy to Production
- stage: DeployToProduction
  displayName: 'Deploy to Production'
  dependsOn: ApproveProduction
  condition: succeeded('ApproveProduction')
  jobs:
    - deployment: DeployProduction
      displayName: 'Deploy unified package to Production'
      environment: 'Production'
      timeoutInMinutes: 180
      strategy:
        runOnce:
          deploy:
            steps:
              - download: D365FO-Release
                artifact: 'UnifiedPackage'
                displayName: 'Download unified package artifact'

              - task: PowerPlatformToolInstaller@2
                displayName: 'Install Power Platform Build Tools'

              - task: PowerPlatformWhoAmI@2
                displayName: 'Verify Production service connection'
                inputs:
                  authenticationType: 'PowerPlatformSPN'
                  PowerPlatformSPN: '$(ProductionServiceConnection)'

              - task: PowerPlatformDeployPackage@2
                displayName: 'Deploy unified package to Production'
                inputs:
                  authenticationType: 'PowerPlatformSPN'
                  PowerPlatformSPN: '$(ProductionServiceConnection)'
                  PackageFile: '$(Pipeline.Workspace)/D365FO-Release/UnifiedPackage/TemplatePackage.dll'
                  Environment: '$(ProductionEnvironmentUrl)'
This is final stage of our Continuous Delivery (CD), it deploys the Unified Package to the Production environment after successful manual approval. It downloads the package, installs the required build tools, verifies the Production service connection, and deploys the package to the Production environment.
Note: you can find the complete Azure DevOps Continuous Delivery (CD) YAML code in this GitHub Repository .
To get started create the Continuous Delivery (CD) pipeline navigate to your Azure DevOps project from the left hand navigation menu select Pipelines > New Pipeline > Azure Repos Git.
Select a repository for example my own called D365FO then select
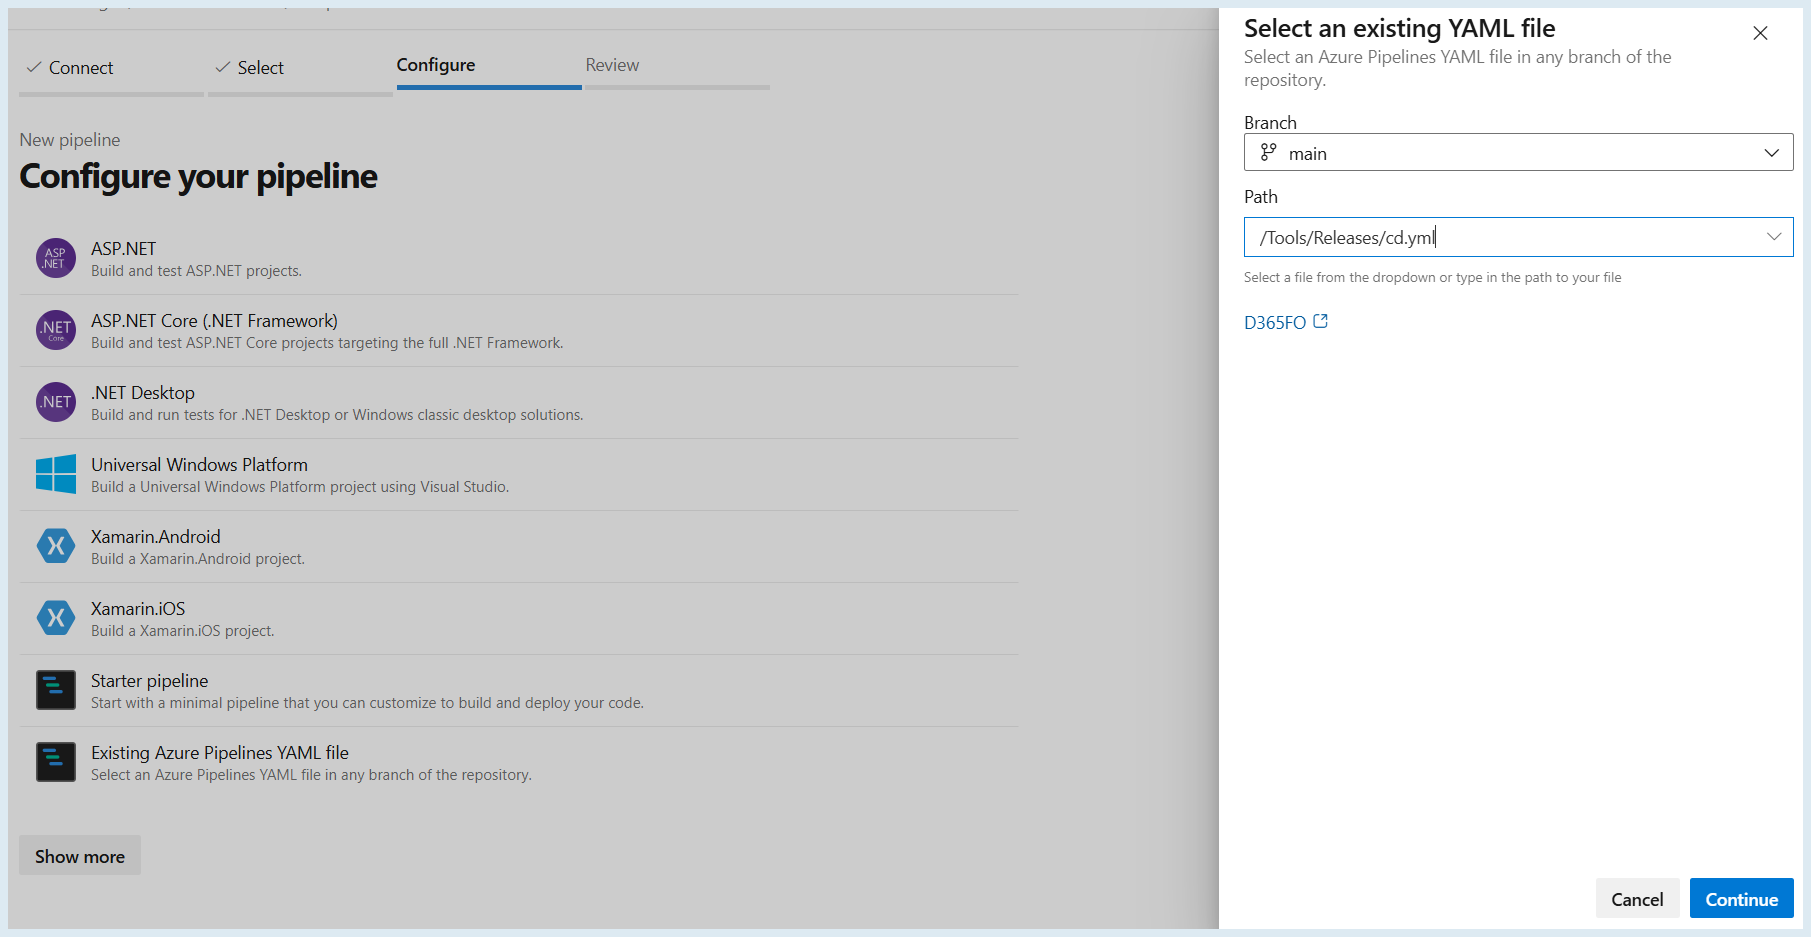
Configure your pipeline > Existing Azure Pipelines YAML file In our repository structure the CD pipeline lives at this path: D365FO\Tools\Releases\cd.yaml.
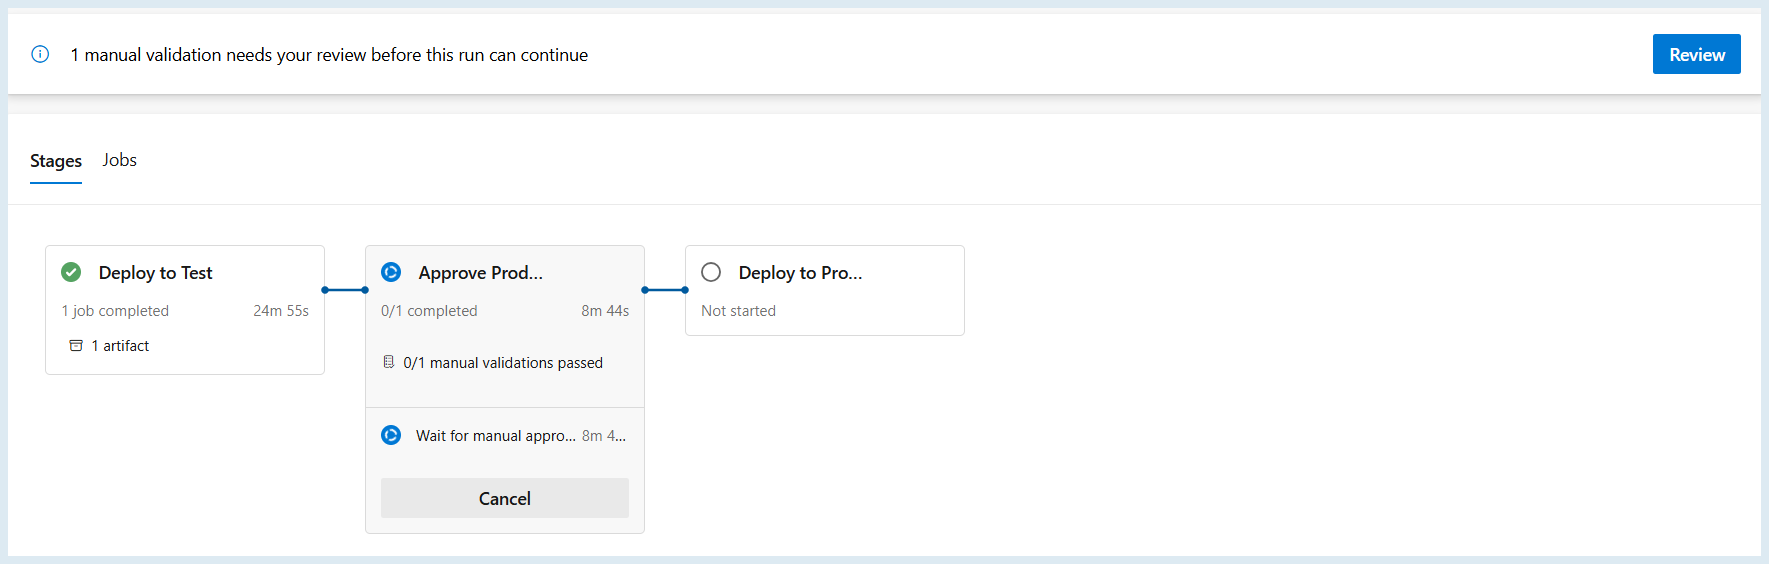
Pipeline status: Deploy to Test (UAT) succeeded published 1 artifact. The run is now paused at the Approve Prod stage waiting to manual approval deploy to Production has not started and stays blocked until someone clicks Review and approves.